Introduction
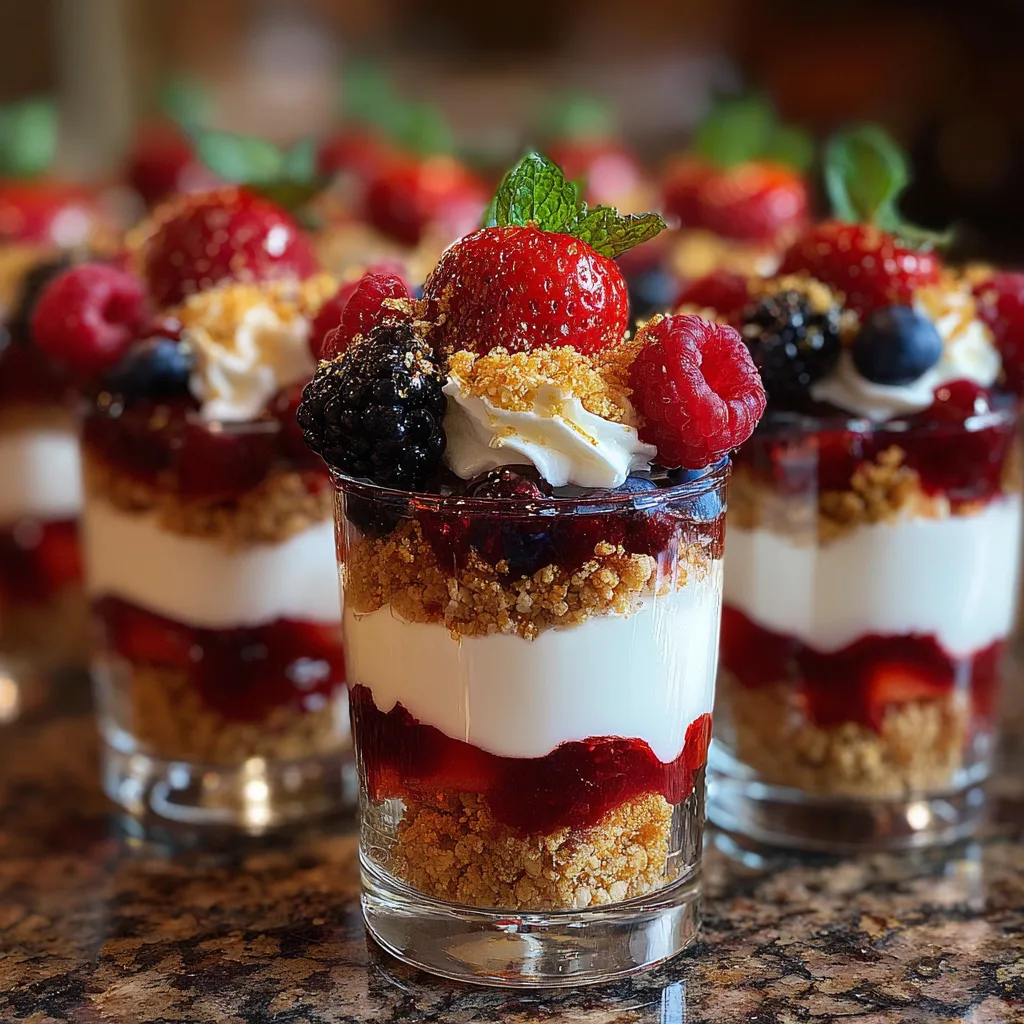
If you’re looking for a dessert that feels luxurious without turning on the oven, these No-Bake Berry Trifle Cups are exactly what you need. They are light, creamy, and packed with fresh berry goodness, making them perfect for warm days or last-minute gatherings. I remember making these for a small family get-together, and they disappeared faster than any baked dessert on the table.
What makes this recipe truly irresistible is the combination of textures—soft cake layers, juicy berries, and silky cream all stacked into beautiful individual cups. It’s the kind of dessert that looks like it took hours to prepare, yet comes together in minutes. Whether you’re planning a brunch, a celebration, or just craving something sweet and refreshing, these trifle cups deliver both flavor and elegance in every spoonful.
Why You’ll Love This Recipe
These No-Bake Berry Trifle Cups are quick, effortless, and visually stunning. They require zero baking, making them ideal for busy days or hot weather. The layers create a perfect balance of sweetness and freshness, while the individual servings make them perfect for entertaining. They are also incredibly flexible, allowing you to mix and match fruits, creams, and cake bases depending on your taste.
Print
No-Bake Berry Trifle Cups (Pinterest GOLD – The Ultimate Easy Layered Dessert)
- Total Time: 50 minutes
- Yield: 6 servings
- Diet: Vegetarian
Description
No-bake berry trifle cups are an easy layered dessert made with fresh mixed berries, soft cake, and creamy whipped filling—perfect for parties, holidays, or quick sweet cravings.
Ingredients
- 1 cup strawberries, sliced
- 1 cup blueberries
- 1 cup raspberries
- 2 tbsp granulated sugar
- 1 tsp lemon juice
- 2 cups whipped cream
- 1 cup cream cheese, softened
- 1/2 cup powdered sugar
- 1 tsp vanilla extract
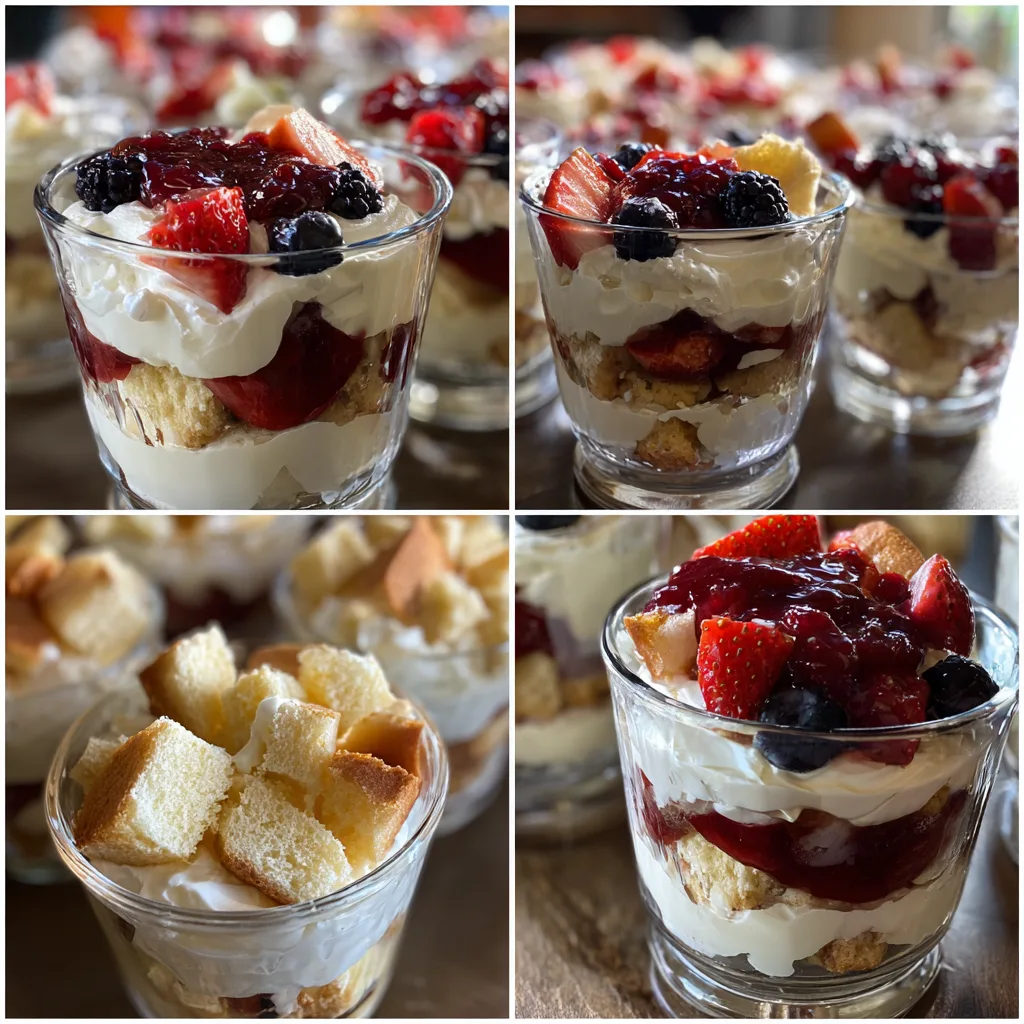
- 2 cups sponge cake or ladyfingers, cubed
- Mint leaves for garnish (optional)
Instructions
- In a bowl, combine strawberries, blueberries, raspberries, sugar, and lemon juice. Toss gently and let sit for 10 minutes.
- In another bowl, beat cream cheese, powdered sugar, and vanilla extract until smooth.
- Fold whipped cream into the cream cheese mixture until light and fluffy.
- Prepare small serving cups and add a layer of cake cubes at the bottom.
- Add a layer of mixed berries with some juice.
- Spoon a layer of the cream mixture over the berries.
- Repeat layers until cups are filled, ending with cream on top.
- Garnish with fresh berries and mint leaves if desired.
- Chill for at least 30 minutes before serving.
Notes
- You can use frozen berries (thawed) if fresh are not available.
- Substitute cream cheese with Greek yogurt for a lighter option.
- Best served within 24 hours for freshness.
- Add granola for a slight crunch.
- Prep Time: 20 minutes
- Cook Time: 0 minutes
- Category: Dessert
- Method: No-Bake
- Cuisine: American
Ingredients
(Tip: You can find the complete list of ingredients and their measurements in the recipe card below.)
Mixed berries
A combination of strawberries, blueberries, and raspberries brings vibrant color and natural sweetness. I like using fresh berries for the best flavor, but frozen can work in a pinch.
Granulated sugar
This helps enhance the natural sweetness of the berries and creates a light syrup that soaks beautifully into the layers.
Vanilla cake or ladyfingers
These form the base of the trifle. Ladyfingers give a slightly firmer texture, while cake creates a softer, more melt-in-your-mouth experience.
Heavy whipping cream
Whipped into soft peaks, this adds a light and airy richness that ties everything together.
Powdered sugar
Used to sweeten the whipped cream smoothly without any grainy texture.
Vanilla extract
A small amount enhances the overall flavor and gives the cream a warm, aromatic note.
Cream cheese
This adds a subtle tang and richness to the cream layer, making it more stable and flavorful.
Lemon zest (optional)
A hint of lemon zest brightens the dessert and balances the sweetness beautifully.
Mint leaves (optional)
Perfect for garnish, adding a fresh and elegant finish.
Directions
Start by preparing the berries. Wash and slice the strawberries, then combine all the berries in a bowl with granulated sugar. Let them sit for about 15 minutes so they release their juices and become slightly syrupy.
Next, prepare the cream layer. Beat the cream cheese until smooth, then add powdered sugar and vanilla extract. In a separate bowl, whip the heavy cream until soft peaks form, then gently fold it into the cream cheese mixture until smooth and fluffy.
If using cake, cut it into small cubes. If using ladyfingers, break them into bite-sized pieces. Now you’re ready to assemble.
Start with a layer of cake or ladyfingers at the bottom of each cup. Add a spoonful of berries, followed by a generous layer of cream. Repeat the layers until the cups are filled, finishing with cream on top.
Garnish with fresh berries, a sprinkle of lemon zest, or a mint leaf for a beautiful presentation. Chill for at least 30 minutes before serving to allow the flavors to meld together.
Equipment needed : Must-Have Tools to Get Rolling
Here’s what you’ll want to have on hand:
Silicone Spatula – Durable, heat-resistant silicone spatula perfect for mixing, scraping, and spreading. Gentle on non-stick cookware and easy to clean.
Large pot – You’ll need this to boil the whole cabbage head and soften the leaves.
large bowl –Spacious, durable large bowl ideal for mixing, serving, or food preparation. Made from sturdy material and easy to clean.
Sharp knife – For coring the cabbage and slicing out the thick stem in each leaf. A paring knife works best.
Mixing bowl – A big bowl makes it easier to combine your meat and rice filling evenly.
Cutting board – For prepping cabbage leaves and rolling them like a pro.
Full-Size Blender – is a powerful kitchen appliance for making smoothies, soups, and sauces in large batches.
3-in-1 Air Fryer – This versatile 3-in-1 air fryer offers Air Fry for healthier meals with less oil, Bake for bakery-quality desserts and treats, and Reheat to bring leftovers back to life with crispy, flavorful results
Servings and timing
This recipe yields about 6–8 servings. Preparation takes approximately 20 minutes, with an additional 30 minutes of chilling time, making it a quick and convenient dessert option.
Storage/reheating
Store the trifle cups in the refrigerator for up to 2 days, covered to keep them fresh. These are best served chilled and do not require reheating. For best texture, add garnishes just before serving.
Variations and Customizations
One of the reasons these No-Bake Berry Trifle Cups became a staple in my kitchen is how easy they are to customize. You can switch up the berries depending on what’s in season or what you have on hand. Blackberries or even sliced peaches can add a delicious twist.
For a slightly richer version, try using mascarpone instead of cream cheese. It gives a smoother, more decadent texture that feels extra indulgent. If you prefer a lighter option, you can replace part of the cream with Greek yogurt for a tangy and protein-rich alternative—I tried this once, and it added a refreshing depth to the dessert.
You can also experiment with different cake bases. Chocolate cake adds a deeper flavor, while sponge cake keeps things airy and light. For a fun variation, add a drizzle of berry sauce or even a splash of fruit juice to soak the layers slightly.
If you’re making these for a party, consider layering them in mason jars for a rustic look, or use elegant glasses for a more refined presentation. You can even turn this into a large trifle bowl for sharing.
The flexibility of this recipe makes it perfect for creativity, allowing you to tailor it to any occasion or personal preference.
Nutrition and Dietary Info
| Nutrient | Per Serving |
|---|---|
| Calories | 320 kcal |
| Protein | 4 g |
| Carbs | 35 g |
| Fat | 18 g |
| Saturated Fat | 11 g |
| Fiber | 3 g |
| Sugar | 24 g |
| Sodium | 150 mg |
Expert Tips & Customizations
Use soft peaks
Whip the cream just until soft peaks for a smooth texture.
Balance sweetness
Taste your berries before adding sugar and adjust as needed.
Layer carefully
Neat layers create a beautiful presentation in clear cups.
Chill before serving
This enhances flavor and helps the layers set properly.
Add citrus touch
A bit of lemon zest brightens the entire dessert.
FAQs
Can I make this dessert ahead of time?
Yes, it can be prepared a day in advance and stored in the refrigerator.
Can I use frozen berries?
Yes, but thaw and drain them to avoid excess moisture.
What can I use instead of cream cheese?
Mascarpone or Greek yogurt are great alternatives.
Can I make it sugar-free?
You can use a sugar substitute suitable for baking and whipping cream.
How do I keep the layers from getting soggy?
Avoid adding too much berry syrup to the cake layers.
Can I make this in a large dish instead of cups?
Yes, simply layer everything in a trifle bowl for a family-style dessert.
Conclusion
No-Bake Berry Trifle Cups are the definition of effortless elegance. With their vibrant layers, fresh flavors, and creamy texture, they are perfect for any occasion—from casual gatherings to special celebrations. Once you try them, you’ll see why they’ve become a Pinterest favorite and a go-to dessert for anyone who loves quick, beautiful, and delicious treats.
Hungry for more? Visit our website for full recipes and follow us on Pinterest for daily foodie inspo you’ll love to pin!