Polish cheese buns, or drożdżówki, are a beloved pastry in Poland, often enjoyed with a cup of tea or coffee. These sweet, soft buns with a creamy cheese filling offer a perfect balance of flavors and textures. The yeast dough is incredibly fluffy and light, while the cheese filling adds a rich and slightly tangy taste. Whether you are familiar with Polish cuisine or exploring it for the first time, these buns are sure to win you over with their irresistible taste and aroma.
This recipe brings a touch of Poland into your kitchen with its perfect combination of sweet and savory flavors. These cheese buns make for a delightful breakfast or afternoon snack. Follow along to learn how to create your own drożdżówki from scratch—it’s easier than you might think!
Print
Polish Cheese Buns (Drożdżówki): A Deliciously Soft and Savory Treat
- Total Time: 2 hours 30 minutes
- Yield: 10-12 buns
- Diet: Vegetarian
Description
Polish cheese buns, known as Drożdżówki z serem, are soft, sweet buns filled with creamy cheese. They are often enjoyed for breakfast or as a snack in Poland.
Ingredients
- 2 1/4 teaspoons active dry yeast (1 packet)
- 1/2 cup warm milk (110°F)
- 1/4 cup sugar
- 2 1/2 cups all-purpose flour
- 1/2 teaspoon salt
- 1/4 cup unsalted butter, softened
- 2 large eggs
- 1 teaspoon vanilla extract
- 1/4 cup sour cream or plain yogurt
- 1 1/2 cups twaróg cheese (or ricotta)
- 1/4 cup powdered sugar
- 1 teaspoon vanilla extract
- 1 egg yolk
- 1 tablespoon melted butter
- 1 egg (for egg wash)
Instructions
- In a small bowl, combine the warm milk, yeast, and sugar. Stir until dissolved and let it sit for about 5-10 minutes until the yeast becomes frothy.
- In a large bowl, mix the flour and salt. Add the butter, eggs, vanilla extract, sour cream, and the yeast mixture.
- Knead the dough until it becomes smooth and elastic, about 5-7 minutes.
- Cover the dough with a clean kitchen towel and let it rise in a warm place for about 1 to 1 1/2 hours or until it has doubled in size.
- In a medium bowl, combine the twaróg cheese, powdered sugar, vanilla extract, egg yolk, and melted butter. Mix well until smooth and creamy.
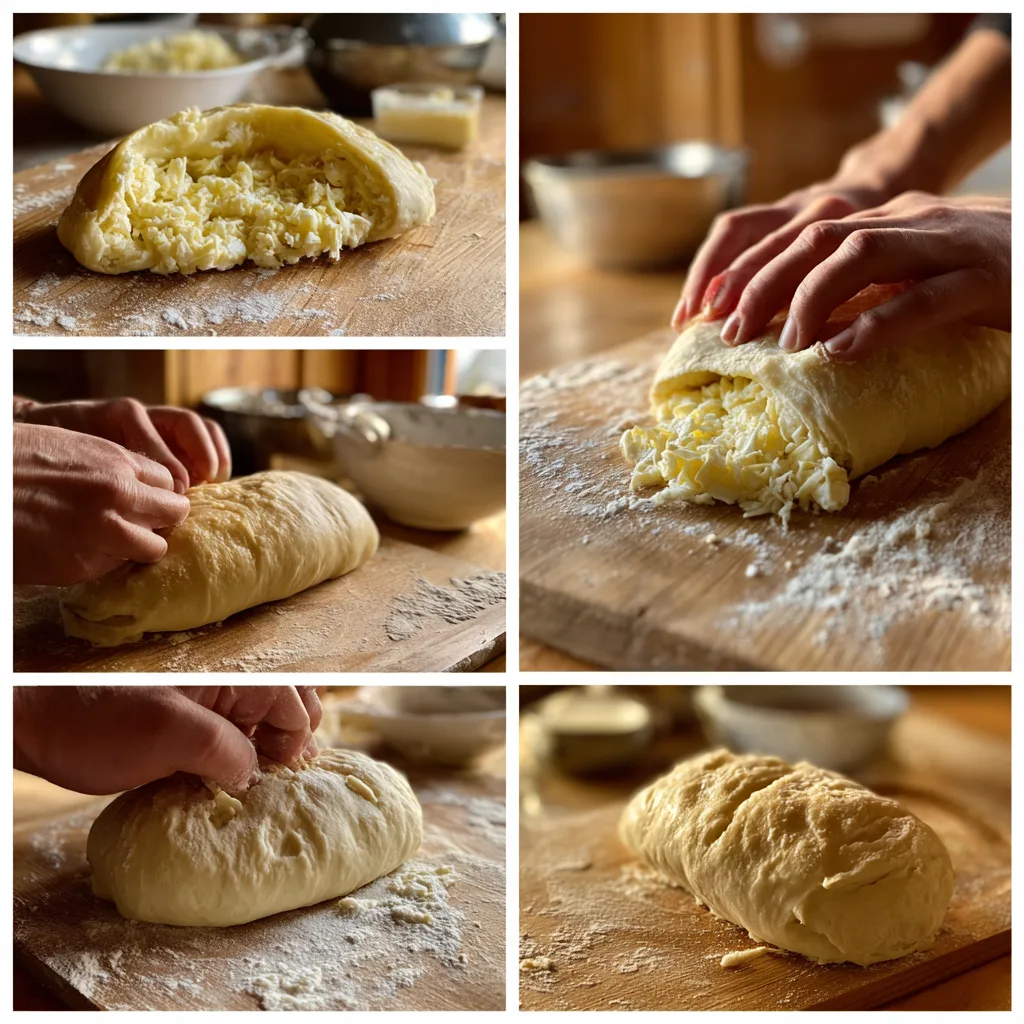
- Once the dough has risen, punch it down to release the air. Divide the dough into 10-12 equal pieces.
- Roll each piece into a ball, then flatten it slightly into a small round shape (about 3 inches in diameter).
- Using your fingers, create a small indentation in the center of each dough round to hold the cheese filling.
- Spoon a generous amount of the cheese mixture into the center of each flattened dough round.
- Gently fold up the sides of the dough around the cheese filling, pinching the dough together to form a bun.
- Place the filled buns on a parchment-lined baking sheet. Cover them with a clean towel and let them rise for another 30 minutes.
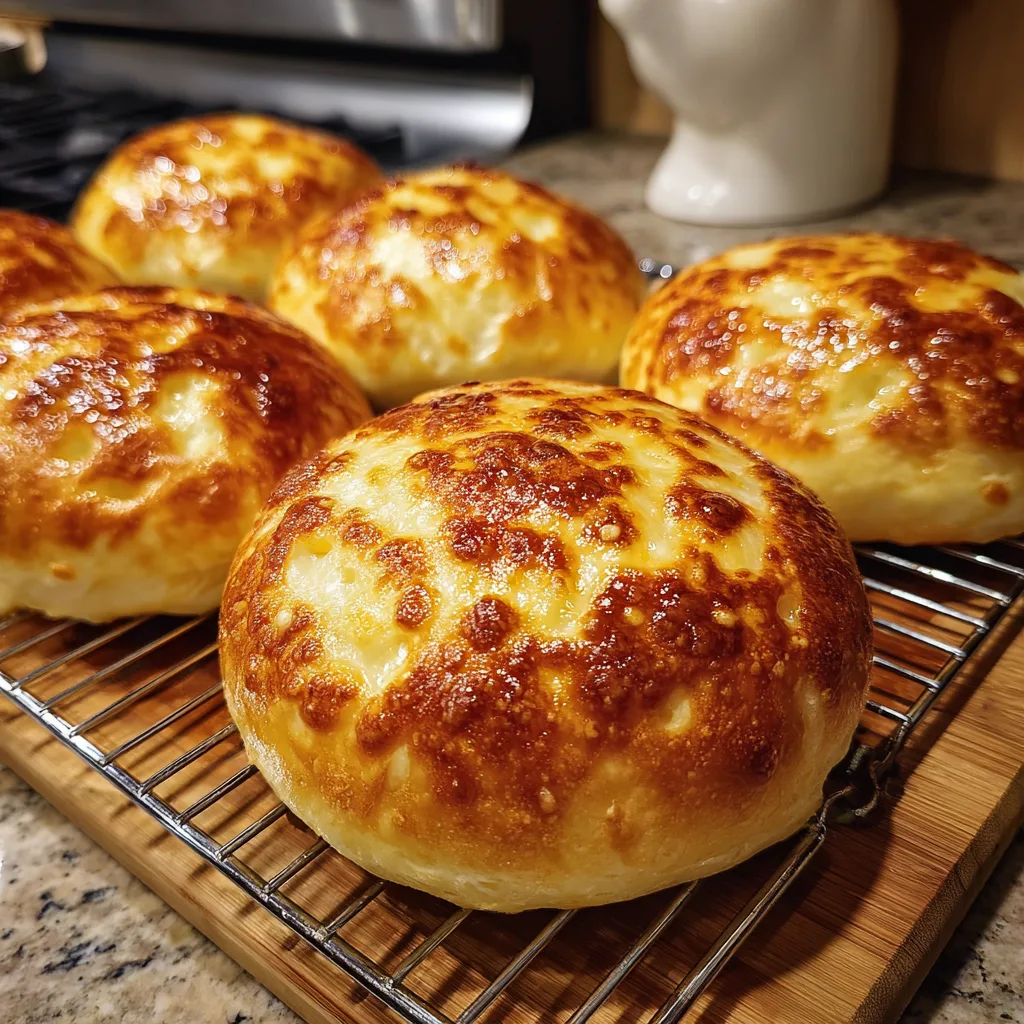
- Preheat your oven to 350°F (175°C). Brush each bun with the beaten egg.
- Bake the buns for 20-25 minutes, or until golden brown on top and cooked through.
- Once baked, remove the buns from the oven and let them cool slightly. Optionally, sprinkle powdered sugar on top before serving.
Notes
- Use twaróg cheese for the most authentic flavor, but ricotta can be used as a substitute.
- If you prefer a sweeter filling, adjust the amount of powdered sugar to taste.
- You can freeze the buns after baking; just reheat them in the oven before serving.
- Prep Time: 2 hours
- Cook Time: 25 minutes
- Category: Bakery
- Method: Baking
- Cuisine: Polish
Ingredients
(Tip: You can find the complete list of ingredients and their measurements in the recipe card below.)
All-Purpose Flour – The foundation of the dough, all-purpose flour gives the buns structure and texture. It creates a light, airy dough when combined with the other ingredients.
Active Dry Yeast – Yeast is key to creating the fluffy texture of the buns. It causes the dough to rise, giving it the soft, pillowy consistency that is characteristic of drożdżówki.
Sugar – A small amount of sugar helps to activate the yeast and adds a slight sweetness to the dough. It also balances the savory flavor of the cheese filling.
Salt – Salt is essential to enhance the overall flavor of the dough. It helps balance the sweetness from the sugar and creates a richer flavor profile in the buns.
Warm Milk – Warm milk helps dissolve the yeast and sugar, promoting the activation process. It also contributes to the soft texture of the dough.
Butter – Butter adds richness and tenderness to the dough, making it soft and flavorful. It also contributes to the golden color of the buns.
Egg – An egg helps bind the dough together and adds richness. It also provides color and structure to the final buns.
Cottage Cheese – The traditional filling for drożdżówki is made with cottage cheese, which has a mild flavor and creamy texture. It is often sweetened with a bit of sugar and flavored with vanilla.
Sugar (for the filling) – A small amount of sugar is added to the cottage cheese to sweeten it, balancing the savory taste of the cheese.
Vanilla Extract – Vanilla extract adds a subtle sweetness and depth of flavor to the filling, making it more aromatic and delicious.
Egg (for egg wash) – The egg wash gives the buns a beautiful golden finish and a shiny surface once baked.
Directions
- Prepare the Dough:
In a large mixing bowl, combine the warm milk, active dry yeast, and a teaspoon of sugar. Let the mixture sit for about 5-10 minutes until it becomes frothy, signaling that the yeast is active. Add the flour, remaining sugar, salt, and melted butter to the bowl, followed by the egg. Mix the ingredients until a dough begins to form. - Knead the Dough:
Turn the dough out onto a lightly floured surface and knead it for about 8-10 minutes until it is smooth and elastic. You can also use a stand mixer with a dough hook for this step. Place the dough in a lightly greased bowl, cover it with a clean kitchen towel, and allow it to rise in a warm place for 1-2 hours, or until it has doubled in size. - Make the Cheese Filling:
While the dough is rising, prepare the cheese filling by mixing the cottage cheese, sugar, and vanilla extract in a bowl. Stir until smooth. Set aside. - Shape the Buns:
Once the dough has risen, punch it down to release the air. Divide the dough into small equal pieces (about 12-16, depending on how large you want your buns). Roll each piece into a ball and flatten it slightly with your hands. Spoon a generous amount of the cheese filling into the center of each piece of dough. - Fold and Seal:
Carefully fold the edges of the dough over the filling, pinching them to seal the buns. You can either shape them into a round bun or slightly elongated. Place the buns on a parchment-lined baking sheet, leaving space between them for expansion. - Proof the Buns:
Cover the buns with a kitchen towel and allow them to rise again for 30-45 minutes, or until they puff up. - Preheat the Oven:
While the buns are rising, preheat your oven to 375°F (190°C). - Egg Wash:
Beat the second egg and brush the tops of the buns with the egg wash to give them a beautiful golden finish during baking. - Bake the Buns:
Place the buns in the preheated oven and bake for 20-25 minutes or until they are golden brown on top and cooked through. - Cool and Serve:
Allow the buns to cool slightly on a wire rack before serving. Enjoy them fresh or at room temperature with a cup of coffee or tea.
Servings and Timing
This recipe yields approximately 12-16 buns, depending on the size of each bun. The total time for making these Polish cheese buns, including preparation, rising, and baking, is around 3-4 hours.
Equipment Needed:
Here’s what you’ll want to have on hand:
Silicone Spatula – Durable, heat-resistant silicone spatula perfect for mixing, scraping, and spreading. Gentle on non-stick cookware and easy to clean.
Large pot – You’ll need this to boil the whole cabbage head and soften the leaves.
large bowl –Spacious, durable large bowl ideal for mixing, serving, or food preparation. Made from sturdy material and easy to clean.
Sharp knife – For coring the cabbage and slicing out the thick stem in each leaf. A paring knife works best.
Mixing bowl – A big bowl makes it easier to combine your meat and rice filling evenly.
Cutting board – For prepping cabbage leaves and rolling them like a pro.
Full-Size Blender – is a powerful kitchen appliance for making smoothies, soups, and sauces in large batches.
3-in-1 Air Fryer – This versatile 3-in-1 air fryer offers Air Fry for healthier meals with less oil, Bake for bakery-quality desserts and treats, and Reheat to bring leftovers back to life with crispy, flavorful results
Must-Have Tools to Get Rolling
Here’s what you’ll want to have on hand:
- Mixing Bowl for preparing the dough and cheese filling
- Stand Mixer or Hand Mixer (optional, for kneading the dough)
- Rolling Pin to flatten the dough
- Baking Sheet lined with parchment paper
- Pastry Brush for applying the egg wash
- Wire Rack for cooling the buns after baking
Variations and Customizations
While the classic Polish cheese filling is a favorite, there are many ways you can customize these drożdżówki to suit your taste preferences.
Fruit Fillings
You can add fresh or dried fruit to the filling for an extra burst of flavor. Fruits like blueberries, raspberries, or apples pair wonderfully with the creamy cottage cheese. Simply stir in small chunks of fruit into the cheese mixture.
Sweet vs. Savory
While the classic filling is sweetened with sugar and vanilla, you can opt for a savory version. Swap the sugar for a pinch of salt and use a savory cheese, such as ricotta or feta, instead of cottage cheese. Adding some chopped herbs like chives or dill will elevate the flavor even more.
Vegan Option
To make a vegan version, use plant-based milk (such as almond or oat milk) and a dairy-free butter substitute. For the filling, you can use dairy-free cream cheese or silken tofu as a replacement for cottage cheese.
Gluten-Free Option
For a gluten-free version, substitute the all-purpose flour with a gluten-free flour blend. Keep in mind that the texture may differ slightly, but the buns will still be soft and delicious.
Add a Streusel Topping
For extra texture and sweetness, consider topping the buns with a simple streusel made of butter, flour, and sugar before baking. This adds a crunchy element to the otherwise soft bun.
Nutrition and Dietary Info
Here’s a breakdown of the nutrition facts per serving:
| Nutrient | Amount per Serving |
|---|---|
| Calories | 220 |
| Protein (g) | 6 |
| Carbs (g) | 30 |
| Fat (g) | 8 |
| Saturated Fat (g) | 4 |
| Fiber (g) | 1 |
| Sugar (g) | 5 |
| Sodium (mg) | 150 |
Expert Tips & Customizations
Use Room Temperature Ingredients
Make sure your milk, butter, and egg are at room temperature before mixing. This helps the ingredients combine more smoothly and ensures the dough rises properly.
Double-Rise for Extra Fluff
If you have the time, give the dough a second rise after shaping the buns. This will make the buns even fluffier and lighter.
Cool Completely Before Storing
Allow the buns to cool completely before storing them in an airtight container. This helps prevent them from becoming soggy.
FAQs
Can I use ricotta cheese instead of cottage cheese?
Yes, ricotta works well as a substitute. It has a creamier texture but still offers a mild flavor similar to cottage cheese.
Can I make these buns ahead of time?
You can make the dough ahead of time and refrigerate it overnight. Allow it to come to room temperature before continuing with the recipe.
How can I make these buns sweeter?
You can add more sugar to the dough or filling if you prefer a sweeter taste. Adding a drizzle of icing over the buns after baking also works great.
Can I freeze these buns?
Yes, you can freeze the baked buns. Let them cool completely before freezing in a single layer. To reheat, simply warm them in the oven for 10-15 minutes.
Can I use instant yeast instead of active dry yeast?
Yes, you can use instant yeast instead of active dry yeast. There’s no need to dissolve it in warm milk; simply add it directly to the flour.
How do I store leftover buns?
Store leftover buns in an airtight container at room temperature for up to 3 days. For longer storage, keep them in the freezer.
What’s the best way to reheat the buns?
The best way to reheat them is in the oven at 350°F for 5-10 minutes to restore their softness and crisp up the outside.
Can I add other fillings to the buns?
Absolutely! You can try adding chocolate, nuts, or a combination of sweet cheese and fruit for more variety.
Can I make these buns gluten-free?
Yes, you can use a gluten-free flour blend in place of all-purpose flour. The texture may be slightly different, but they’ll still be delicious.
How can I make these buns fluffier?
Be sure to knead the dough well and allow enough time for it to rise. A longer rise time will help develop a fluffier texture.
Conclusion
Polish cheese buns (drożdżówki) are a perfect blend of sweetness and savory goodness. Their soft, fluffy texture paired with the creamy cheese filling makes them an irresistible treat for any occasion. Whether you’re making them for breakfast, an afternoon snack, or a special dessert, these buns will definitely impress your family and friends. Enjoy the warmth and comfort of this Polish classic!
Hungry for more? Visit our website for full recipes and follow us on Pinterest for daily foodie inspo you’ll love to pin!